Máy đo độ dày sơn - PAINT BORER 518 USB | Erichsen
The Measuring Principle
The PAINT BORER 518 USB operates in accordance with the standardised wedge cut method in which the specimen is cut in a defined angle.
With a high-resolution digital microscope (50 X magnification) with integrated light (8x white LED, adjustable), equipped with a 2 million pixels CMOS image sensor and scalable precision measurement, a direct image capture directly from the object is made.
With the new 518 USB, connectable to a PC, laptop/WINDOWS-tablet, a convenient digitally supported way is given for visual recognition/ detection/measurement and documentation.
An appropriate software is included.
The Measuring Instrument
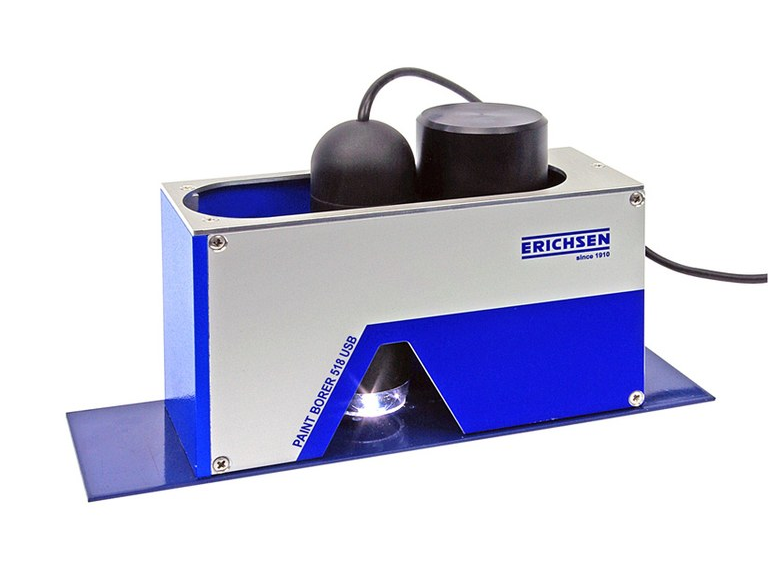
The PAINT BORER 518 USB is a very compact Instrument. All the principal components - the drilling device, the digital microscope, the specimen illumination and the battery - are enclosed in a sturdy housing.
A slide moving on horizontal slide-ways houses the drill and microscope and gives the PAINT BORER 518 USB its particular feature: the instrument itself does not have to be moved for measuring after drilling.
The drill is spring mounted in the slide so that it can be pressed down onto the specimen with minimum force, the drill being switched on automatically when this is done. The carbide drills are easy to exchange and supplied with different accurately maintained cutting angles for 3 standard measuring ranges.
The light button on the backside of the PAINT BORER 518 USB can be set for either continuous light as well as three levels of illumination or interrupted illumination to prolong battery life. A 9-volt rechargeable battery is employed; mains operation with the charging unit is possible.
Optionally, a specimen table for fixation/ measurement of small parts is available (details see page 6).
Depending on the drilling angle, by a tangential function the selected intervals can now be assigned due to the respective layer thickness of the obliquely vertically cut areas.
Thus, with only one bore, every single layer as well as individual layers of multi layers can be captured and measured.
The necessary formula works and all the relevant controls are already part of the standard software.
Also ellipsoid holes on one-dimensionally curved geometries are already considered in a reasonably feasible manner.
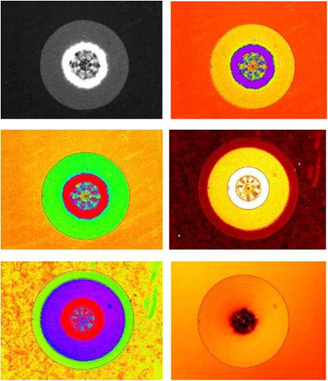
For improvement of the contrast within the visual determination/recognition of the layer transition lines, the display of the hole is by choice in black & white as well as also in a selection of other different colors possible (see examples).
As an additional great advantage to avoid communication-given information errors from user to user, customer to supplier, supplier to customer, etc., there’s the possibility of storing/logging the entire relevant measuring thread with data and image.
The Operation
The coating thickness measurement with PAINT BORER 518 USB is very simple: Apply a contrast mark (felt tip pen) and place the measuring Instrument on the specimen. Move the drill into position over the test point and lower it causing the motor to switch on. Drill the coating through to the substrate. Move the microscope over the hole and switch the lamp on.
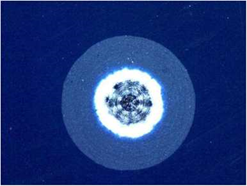
The image Is shown on the display of the connected PC / Laptop / WINDOWS-Tabiet and can be saved for further use/measurement/documentation.
The contrast for the comfortable present imaging sharpness is already preset accordingly.
Use the mouse for the cursor to mark the appropriate relevant positions - the center of the drilled hole as well as all visible layer transition lines.
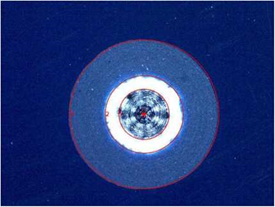
Examples:
|
Standard: |
Thickness Measuring Instrument PAINT BORER 518 USB |
ISO 19399, ISO 2808, ASTM D4138, ASTM D 5796
|
Software: |
Thickness Measuring Instrument PAINT BORER 518 USB |
|
Accessories (optional) |
for models 518 MC/518 USB |
Specimen platform for fixation/measurement of small parts consisting of: Base stand, counter plate with drill window, inflatable rubber impression ball with ergonomic Peleus ball and 3 flexible hard foam cushions.
The small specimen to be measured is fixed after manual positioning on the flexible hard foam cushion under the drill window of the counter plate.
Minimum sample size for small parts: à 17 mm (whether round, square
or otherwise shaped; has to be considered in relation to the drilling and measuring opening of the specimen table I)
The circular executed drilling and measuring opening of the counter plate has a diameter of 15 mm.
Its edge holds the flat surface of the small specimen to be measured, pressed from below, at the correct height level for drilling as well as for focusing and measuring by the measuring microscope.
The upper counter plate with drill window can also be used separately as a free positioning aid (just loosen 4 screws) to set up the PAINT BORER 518 MC or 518 USB on surfaces that would otherwise not be comfortable to set up resp. use due to their too small dimensions (drilling & measuring).

|
Dimensions (L X w X H): |
155 X 55 X 110 mm |
|
Net weight: |
approx. 850 g |
|
Mains supply (optional): |
Accu 6F 22 Battery (9V) 6LR61 Plug-in power pack (100 - 240) VAC, (47 - 63) Hz 18VDC/0.8A |
|
Image sensor: |
2 Megapixels (interpolated to 5M) |
|
Light source: |
8 LED, adjustable |
|
PC interface: |
USB 2.0 or 3.0 |
|
Magnification ratio: |
50x |
|
Photo format: |
PNG |
|
Operation system: |
Windows2000/XP/Vista/7/8/10 |
|
OSD language: |
German, English |
- CÔNG TY THIẾT BỊ CÔNG NGHỆ NĂNG LỰC - SÀI GÒN
- Địa Chỉ cũ: 1A Đường Võ Thành Trang, P.11, Q.Tân Bình, TP. Hồ Chí Minh
- Địa chỉ mới (Sau sáp nhập): 1A Đường Võ Thành Trang, Phường Bảy Hiền, Thành phố Hồ Chí Minh
- Địa chỉ văn phòng: Tòa Nhà An Phú, 117-119 Lý Chính Thắng, Phường 7, Quận 3, Hồ Chí Minh
- Điện thoại: 02.866.848.638
- Hotline : 0976 299 749
 (Mr Tuấn, Giám Đốc Kinh Doanh)
 - Email: [email protected]
Khách hàng cần tư vấn thêm vui lòng liên hệ :
Mr. Tuấn : 0976.299.749 ![]() ( Giám Đốc Kinh Doanh )
( Giám Đốc Kinh Doanh )
Email: [email protected]
Mr. Khanh : 0935.001.617 ![]() (Trưởng Phòng Kinh Doanh )
(Trưởng Phòng Kinh Doanh )
Email: [email protected]
Phòng kinh doanh: tiếp nhận Báo Giá thiết bị các loại
Ms. Nga : 0916.854.178 ![]()
Email: [email protected]
Ms. Ngân: 0906.008.890![]()
Email: [email protected]
Ms. Như: 0984.435.883![]()
Email: [email protected]
Phòng kỹ thuật (tiếp nhận báo giá hư hỏng, sửa chữa thiết bị, hiệu chuẩn)
Ms. Như: 0984.435.883![]()
Email: [email protected]
Mr. Hoàng Anh: 0812.999.909 ![]()
Email: [email protected]
Mr. Phúc: 0366.519.915![]()
Email: [email protected]
If you need further advice, please contact us (for foreign customers only)
Mr. Vinh: 0908.744.225 ![]() (SRM/ Supply Relationship Manager)
(SRM/ Supply Relationship Manager)
Email: [email protected]
| Xin Lưu Ý: Quý Khách vui lòng đính kèm số điện thoại hoặc email vào trong phần nội dung câu hỏi để nhân viên tư vấn có thể phản hồi lại sớm nhất có thể. Hoặc liên hệ trực tiếp thông qua website nangluc.vn để được hỗ trợ nhanh nhất có thể. (Vì ô nhập số điện thoại ở dưới hiện tại không hiệu lực. Mong quý khách thông cảm) Xin Trân Trọng Cảm Ơn! |
Tag:

Sản phẩm liên quan
Cây lăn sơn (hand rollers) Rycobel Model 4.5 lb, 10 lb, Finat
Máy kiểm tra khuyết tật lớp phủ - (DC30) Compact DC Porosity Detector | PCWI Instruments
Máy kiểm tra khuyết tật lớp phủ - (DC15) Compact DC Porosity Detector | PCWI Instruments
Cốc đo tỷ trọng 100ml | NeurTek Instruments
Máy đo độ nhớt Kreb KU-3 | Brookfield
Máy kiểm tra độ bền lớp phủ Cupping Tester CT 15 | NeurTek Instrument
Máy đo độ dày sơn, lớp phủ để bàn - PAINTXPLORER 548 | Erichsen
Máy đo độ dày sơn - PAINT BORER 518 MC | Erichsen
Máy kiểm tra độ bám dính | NeurTek Instruments
Dụng cụ đầu bi kiểm tra độ chà xướt, độ cứng TA-132347 Scratch Tip, 1.0mm diameter hemisphere
Thiết bị dụng cụ kiểm tra độ cứng sơn bằng bút chì độ cứng Pencil hardness tester hãng Neurtek Instruments
Nhận Đặt hàng làm giấy kéo màng sơn các loại trắng đen theo yêu cầu khách hàng ngành sơn nước, sơn dầu